Thursday, 14 December 2017

Latest Progress December

My lesson with Tracy on 1 December was a review of the progress so far and what is left to do.  I am still pondering what to do about the hillocks.  So far I have practised pulling out the horizontal threads to replace the surface with some weaving - I am still not certain about this so will need to think about the hillocks some more (I might put this off until I have finished the other parts) There is a LOT of trailing to do!  All the shapes and stems need the outlining and I need to practise the padded stem stitch for each calix of the large motifs.  The small stem on the left hand side needs attention too.  My thoughts are for a raised chain stitch but this will need practise.

Homework to do before next lesson on 15 December - do as much trailing as I can and aim to complete the padded stem stitch.

Tuesday, 7 November 2017

6 & 7 November Homework – completing the left hand motif

I have completed the large motif on the left-hand side (centre section) Hooray Hooray!!.  This was the laddering (1 strand of DMC cotton floss) over two threads all around the outside of the pointed shape.  On the inside of this is the trellis work; the horizontals and verticals worked with no.20 Coton à Broder, with a spacing of two threads.  Split stitch around the edge of the trellis and the laddering to provide a firm base for all the trailing around the trellis, laddering and pulled work sections.  I wanted this to be less prominent than the leaf section below so used a two-strand core of no.16 Coton à Broder, instead of a three-strand core. Then finally stitched crosses over the intersections of the trellis with DMC Diamant D5200.  I like the effect of the Diamant, although the photo doesn’t show the sparkle on this section.  Completing this small section of the motif took eight hours.

Completed left hand motif
I found stitching the whole section more difficult than anticipated.  The laddering is not very even in some places as it goes around the curve.  Similarly, the trailing around the curves was difficult as pushing the needle through the tight stitching was tricky.  

The crosses on the trellis took a whole morning to complete as the spacing between each horizontal and vertical is very small.  

Now I have taken a photo of the motif I can also see some holes in the net stitching, these will have to be mended when the organdie is cut away.  

Unfortunately, the Moyra McNeill book I ordered on drawn thread work has not arrived, so I have not been able to practise some designs for the hillocks.  I will have to do this at Tracy’s in my next lesson.

Wednesday, 25 October 2017

Getting on with it, and the reveal!

Originally my aim of homework for next lesson on 27 October was to get the sampling out of the way…  and complete a new piece of Net darning for the work.

22 October focused on the practise of leaf pairs hanging down from the main stems.  One part of the pair will be the Chequer Grounding using 1 strand of S5200; stitched on the diagonal with a gap between sequences 12321 – 12321 – 12321;  the gap between the rows is filled with a 121 pattern with Diamant thread.  The other side will be Raised Fishbone stitch, these need some practise to find a suitable thread not only to suit the stitch and thread count of fabric, but also to complement its leaf partner.  Start by neatly outlining the shape with a single strand of cotton floss, then use 2 strands for the filling.  The cotton is OK but need to use a mellor to keep the strands flat rather than twisted.  Need to use a sharp needle to pierce the fabric to get stitches close to each other for the best effect.  Second sample used Perle no.8.

I had intended to finish the laddering around the edge of the large motif with fine trailing around the part of the motif.  BUT

23 October – I decided to just go for it. stop phaffing around and do some stitching on my actual piece of work.  Having completed the replacement piece of net darning, I tacked both patterns onto my work.  Today I started the trailing! A triple core of no.16  Coton à Broder with one stand wrap.  To finish the basic layer I also did the padding ready for the satin stitch which will be covered Coton à Broder no. 20 as the surface stitch.
Trailing and padding preparation for cutting away the surface linen


I have to say I am quite pleased with the trailing. 

24 October – a steady hand needed, with great trepidation I cut the linen surface. Snipping very carefully into the spaces between the curves.  Then a line of split stitch beside the trailing ready for the second line; I used the triple core of No.16 as before.  Then completed the padded satin stitch.  

This was a very intensive day of stitching!  Here it is - the great reveal stage 1  and in close up below:
Ta Dah! The net insert complete


Close up of net insert


Right hand side motif with net darning insert

Having made such good progress, I got on with the leaf motif for the right hand side.  The net darning pattern is a star shape.  Unfortunately this has not been as effective as the flower pattern.  The coverage within the cut away section does not show much of the net darning.  I also had some problems when cutting away the organdie from the back of the work and a small repair had to be made with 160 lace thread.  Still it is done - this side took six hours to complete.  

The motif on the left hand side worked much better as the pattern was more solid filling the open area more effectively.
Left hand side motif with net darning insert


Sunday, 22 October 2017

Practising the net darning insert for the leaf motif

18-20 October:  


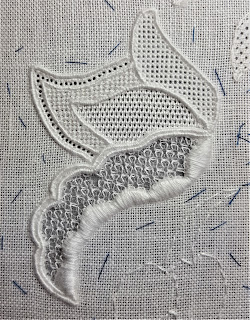
I completed the net darning some time ago.  The time has come to get on with inserting it into a full-scale sample on my practice piece.  Tracy suggested some points to remember:  Organdie can be used as the support on the back of the work but this must be on the same grain as the linen top fabric.  The net darning itself can be at an angle if this fits in with the overall design.  This is good news at the leaf sections are at different angles on the left and right side of my design.

The shape outline should already be on the linen from the tack and tear, but check this absolutely accurate.  Use a fine thread (e.g. a double thread of 160 lace thread), and a small running stitch for the outline of the shape to be filled on the top layer (the linen), this must be absolutely accurately placed.  This will be used as the guide line for the outline trailing later.


Line up the grain of the organdie to the linen, cut a rectangle of organdie that is at least 1cm bigger all round than the shape to be filled.  


Keeping the net flat, place this right side up on the organdie at the desired angle.  Tack into position.  Place this on the back of the linen so the net is the filling in the sandwich -  make absolutely sure the net is in the right place – you won’t be able to see it from the front while stitching.  Tack the three layers together neatly so they don’t move.  Hold the fabric up to the light to check the net is exactly where it should be. 


Another thing I learned after completing the sample  - I should have looked more closely at this stage - I would have seen that the tacking was going to get caught in the stitching... 


Split stitch the outline from the top securing the sandwich together.  Using the chosen threads (e.g. two strands of coton a broder no 16, as the core, and one to wrap), very neatly use trailing around the shape on top of the split stitch.

When trailing is complete, very, very carefully snip at the linen layer close to the trailing to reveal the net stitching below.  Use a pair of lace makers scissors with a ball point on the blades – this should help reduce the possibility of accidentally cutting the net ….

Oops another little diversion and purchase…  have just bought a pair of napping/applique scissors – they have arrived, but they look rather big for delicate work!

The result:   I managed to do the net insert.  See the image of sample.

Overall, I am happy the effect, but the execution needs some improvement.  There are some things I would do differently:

Do not use a coloured tacking thread – IT IS going to get caught up in the stitching and be a nightmare to remove – use a fine white lace cotton thread.

Split stitch and pad the area for satin stitch DO NOT Complete satin stitch until the linen is cut away.

I used two rows of trailing – 2 threads of coton a broder no.16  on the inner row, 3 core on the outer.   Only do the outer row of trailing before snipping away the top layer of linen.  When the linen is cut away, then do the inner row of trailing and the padded satin stitch, this should help mask any stray linen threads at the edges. 


My next lesson is 27 October – I must have some progress on my actual piece of work.


Having used the net darning for my sample I need to complete another piece on the silk net for my actual work.
Friday, 20 October 2017

Practising surface stitches

13 October – Lesson number 3 (?) at Tracy’s 

There has been quite a long gap between stitching sessions due to holiday and preparing for the Embroiderers’ Guild Branch AGM…  Slight distraction, while browsing for more books on stitching ideas I came across a bargain copy of ‘Pulled Thread’ by Moira McNeill.  Although originally published in 1971, it is just fabulous.  There are so many different stitches, very clearly photographed with good diagrams to show movement of stitches across the fabric.  In my opinion this book is far better than the RSN essential guide (sorry RSN – but you don’t always get it right!). Now back to work.

Still practising on the sample piece.  Have been trying a couple of drawn thread designs for a border.  This pattern comes from my ancient copy of ‘Mary Thomas’s Embroidery Book’.

I could really get carried away with this and do a complete sampler piece…  but must focus!


I have been thinking more about the leaves that hang down from the main twisted stems.  In my original design I was going to do one with long and short stitch and the other with raised fishbone stitch.  But I just cannot get the long and short neat enough on the 32-count linen.  Having spent so much time worrying about this I had decided to abandon that idea and try some different textured surface stitches.  

These ideas are based on canvas work stitches such as Hungarian Grounding, Scotch Stitch and Chequer Grounding.  Threads:  2 strands of stranded cotton are too clumsy so that was pulled out straight away.  Perle no 12 was too heavy and I didn’t like the vertical appearance of the stitch. 1 stand of the stranded cotton with the scotch stitch seemed to be ok but it lacked something.  Tried a one wrap French knot with the Diamant in the gaps, but not sure about this either.  After much pulling out and starting again, I eventually liked the Chequer Grounding using 1 strand of S5200; stitched on the diagonal with a gap between sequences 12321 – 12321 – 12321;  then a gap between the rows.  

This left space between the rows to stitch a 121 pattern.  I tried the single strand of stranded cotton but it looked very lost.... the tried with the diamant thread.  The sparkle is there but is quite subtle. Unfortunately the photo doesn't pick up the sparkle of the diamant.

Haven't done any more stitching on my proper piece - still just practising.  Must make a decision on whether or not there is going to be any more pulled work.

My next task is to do a full size sample of the net insertion - I've been putting this off, because it involves cutting the fabric and this scares me!

Thursday, 19 October 2017

Whitework Homework - The twisted stems

Homework 18-20 September
Catching up posting the blog... I started my notes before the holiday, but didn't get around to taking the photos.  Here is the September progress:

Must make some progress with the pulled work for my work, I seem to have been working on the Practice piece too much.  Ha! Ha!, what does the homework start with… Sampling for one of the large stems -  Reverse Single Faggot stitch.  Cordonet Special no.20 B5200 over three horizontal/vertical threads.  I like the holey effect this has but it is quite difficult to work it on a long curving stem,  the edges are not very smooth, I don't think the trailing will be able to hid the unevenness.  Will have to rethink this stitch.

Sampling stitches for the main stems
For second stem, tried a variation of a Counted Satin Stitch (also known as Gobelin filling stitch), 1 vertical stitch over 6 horizontal threads, then repeat, right across the row.  On Second row, stitch between the previous stitches, dropping thee rows to creating an interlocking pattern similar to brick pattern. 


Also tried a variation of brick pattern, using two then three adjacent stitches over the verticals.  Sample with different threads to have a texture contrast with first stem.  Not so sure about this.

The final version of stems is shown below.  I used the Gobelin filling with Cordonet No20 on one stem, then I eventually decided to use a double mock faggot stitch for .  This has a very similar look to the Reverse Single Faggot, but is worked horizontally across the shape.  I found this much easier to work.  The trailing should smooth off the edges.
Twisted stems on the final piece

Friday, 15 September 2017

Slow progress...

15 September - Lesson at Tracy’s:  

Began by practising fine scale laddering in a straight line using 1 strand of cotton floss.  The correct scale seems to be two horizontal threads between each eyelet, and two vertical threads at each side of the ladder. This is the effect I want for the edge of the motif in the centre of the design.  If I can keep this very fine I will need to practise on the curve for the edge of the leaf shapes.

Next was more practise with the dreaded Herringbone which not only has to fit in a tight curved space with an elongated point, it also has to fit around the centre part which has already been completed with pulled thread stitches.   Lots of trying with this stitch on my practice piece.  Despite many attempts and much pulling out I did not have much success - I could not get an even spread of stitches around the curves.  It looks too clumsy! Abandon this stitch - try variations of trellis stitches with crosses.

After a whole day this is what I achieved:
Rubbish Herringbone! Trellis work and some laddering 
The centre part is a trial with Diamant on the horizontals & verticals, with coral stitch on the diagonal in Coton à Broder no. 30.  This will be too heavy to fit the  narrow border of herringbone replacement.


Tried Coton à Broder no. 30 on the horizontals and verticals in the correct section (2 threads apart)  with the Diamant crosses to tie the threads in place.  This seems to work better.

More practising for the laddering around the outer edge has been worthwhile, I am getting hang of it at last.  Tried a small section on my Practice work.  One strand of stranded cotton seem to achieve a suitable result. 

I will at some point have to sample different weights of trailing to finish the borders between each stitched section on this motif.  That will be fun!

I have a bit of a break before I see Tracy again so hopefully more stitching will go on the whitework...  But I do have a holiday in Ireland to look forward to as well:

I have discovered that the knot tied over the drawn thread crosses is called a coral stitch!  It is usually the knot that is tied on clusters of bars on the drawn thread borders.  One of my aside projects will be to create a sampler of drawn thread patterns.  Oh No!  I got side-tracked on Pinterest and have a page of drawn thread patterns.  I am now thinking I would like to have some borders on my design.

Wednesday, 30 August 2017

Whitework progress - Homework completed!

Working on the diagonal drawn filling:  In my previous blog I mentioned that I stopped work on this stitch as I thought the desired effect between the rows was not showing up very well with the single strand of cotton and at the smaller scale.  Having sampled this stitch at a larger scale (over 3 threads) and smaller scale with coton a broder no.30 and the  S5200 rayon threads I have a comparison of sizing and threads.  I want to use the stranded cotton in this section so my next sample tries the larger scale with 2 strands of B5200 cotton.  This seems to working well, so onto my proper piece of work.


Thirty minutes of unpicking the small scale stitch, then two hours later, both sections of the larger scale diagonal drawn filling completed!.  PHEW!!!

Leaf shapes for left & right hand sides
completed with diagonal drawn filling
and diagonal cross filling


Now onto the filling stitch on the drawn threads.

Lace Pattern Knotting on drawn thread work
The right hand side is a variation of the Lace Pattern with Knotting, worked with a single strand of DMC Light Effects E5200.   Worked across the diagonals one way, then again in the opposite direction to form a diagonal cross in the gap of the drawn threads.  This motif took four hours to complete.


Russian Drawn Filling on drawn thread work
The left hand side is Russian drawn filling, this is worked to form an upright cross in the gaps of the drawn threads.  Three hours to complete this section.


Pulled and Drawn Thread work completed 30 August

That is the planned pulled work and drawn thread work completed in time for my lesson with Tracy.  I feel very relieved to have caught up with my homework.  So far I have spent 81 hours on this section. 


Decision time, do I amend the plan and stitch the large stems with pulled work???  I like the effect of the single reverse faggot stitch and this would be suitable for one stem, but what would be a suitable stitch for  the other stem?

Tuesday, 29 August 2017

More Whitework progress

Well I seem to have put a spurt on...

I have completed almost all of the planned pulled work: I am working through the stitching plan as well as keeping a diary of the days and hours on each section. 

The leaf shapes in the centre, will use two pulled work stitches (a: diagonal drawn filling & b: diagonal cross filling).  T he large motifs in the central section will use four different stitches. The right hand side faggot stitch and honeycomb darning, the left hand side four sided stitch  and wave stitch. 

The intention is to have all these sections (and the drawn thread work) completed for my next lesson with Tracy.


Two days of concerted effort have brought great rewards.  

I have practised wave stitch and honeycomb darning before so was confident that I could work them straight onto my final piece in an afternoon (25 August).  I am reasonably happy with the result.  

left hand side stitching

right hand side stitching
The 26 August was a mega stitching day, I managed the single faggot and four sided stitch in the morning, completing the parts of the large motif.  I decided to keep on working in the afternoon focusing on the leaf shapes.  

I like the effect of the single faggot on the reverse of the work and am tempted to use this on one of the main stems - it will be a lot of extra work but the effect could be lovely!

The diagonal cross filling worked well, so I started the diagonal drawn filling on the left hand side.  I find this stitch quite tricky to do as the starting the second row in the right place is crucial!


Having worked for 9 hours I was getting very tired and I wasn't sure if the scale of the stitch or the single strand of cotton  was correct so decided to leave it for another day.


I was also mindful that I have lots of other things to do in preparation for the Isobel Hall workshop with the Guild on 10 September.... and somehow I got talked into demonstrating some whitework stitches for the Take a Stitch session on 16 September.  That's a big worry for me as I like to be well prepared and means I will have to do several different scale samplers as well as plan stuff to do for the group.


Thursday, 24 August 2017

Whitework progress: 24 August 2017

Net darning
I finally got to grips with the next stage of stitching on the net. The aim for this week was to complete the stars (flower shapes). 

I seemed to spend ages (several hours) drawing star shapes on hexagon patterned paper getting the order of movement right to get an even pattern above and below the surface.... 


Having tried several attempts on the nylon net, I eventually felt confident enough to move onto the silk net.  This will be used on my final piece. The silk net hexagons are not as uniform as the nylon net so can be difficult to follow a straight line.  My first piece was very wonky, so it was abandoned!

Fortunately I only need a small area of stitched pattern, about 8cm by 4cm.   By pinning calico to the edges of the net I was able to secure it more firmly in the hoop.  I worked the pattern in two horizontal runs, first stitching the top arms of the shape moving from right to left, then returning along the row to stitch the lower arms from left to right.  It seems like I have spent all week on this section, but when I got it (how to do the stitching) the finished piece only took an afternoon to do.

I really like the finished pattern on the net.  I hope it will work on the final white work.

Next bit, start doing the pulled work on my proper piece of work.   Will I get enough done before my September lesson with Tracy?


Friday, 18 August 2017

Whitework Sampling

Having almost got to the end of my piece of whitework in June (with Tracy A Franklin in Durham), I decided I didn't like some parts of the design or the different shades of white I had used so abandoned it and started again... 


I decided to only go for bright white threads, dumped the 'blanc' threads and changed the linen from 'antique white' to 'white' but still using the 32 count.  I liked most of the stitches I had already used and would incorporate these in the new design, but I wanted to include more drawn thread work and some net darning as well as the pulled work and surface stitching.  


Outline sketch of new design
Back to the drawing board for a new design with more thoughts on placements of different stitches before needle touched the fabric.  No more making it up on the hoof!  By 2nd July I had come up with this idea:  

I like the idea of the main stems curling around each other, with some of the smaller stems in front of others, and I wanted to have more balance by having similar shapes on both sides of the design, but without being too symmetrical.  


Drawn threads from original sample with 'lace weaving'
working at half scale,
withdrawing two horizontal and vertical threads

My final lesson with Tracy was supposed to be on 5th July.  But having decided to start again I have signed up for another set of lesson to start in September.  However, by this final session and with much relief I had come up with a new stitch plan!  I wanted to keep the lace weaving on one of the drawn thread wok sections, so needed something different for its partner.

Sampling the new motif for drawn thread work


Russian drawn filling on new sample
I really like this filling stitch - it took a bit of working out... This was a whole day's work!  On the finished piece the threads will be secured on the underside.

The plan for the summer break was to do LOTS of sampling for the new stitches, and make progress with the drawn thread work and pulled thread work on my actual piece.
So how far did I get?

Today is 18 August - progress:
The linen is on the slate frame (two hours), the design has been applied with the tack and tear method (five hours), the threads have been drawn and secured from the top two motifs (eight hours).

Net darning with one strand of stranded cotton
I have sampled some net darning for the middle leaf motif:
I do like this stitch although this section when finish is only 8cm by 4cm and it took ten hours to complete!  I am practising a similar sized section with stars, no photo yet as my attempts are rubbish so far.

My next lesson with Tracy is on 8 September, I have sooooo much to do!